Table of Contents
哈夫曼算法是很经典的无损压缩算法,其变形——范式哈夫曼算法广泛用于图片领域,比如 jpeg 就用到了。也是因为要写 jpeg 的编解码器,我才会学习哈夫曼算法的。
原理
无损压缩,就是把一种信息表达换成另一种表达,其中尽可能去掉冗余信息。哈夫曼算法就是把高频字符用较短的编码表示,低频字符用较长编码表示,以此达到压缩数据的目的。
哈夫曼算法讲解网上有很多,这里只简单论述。
- 将字符从低频到高频排序得到一个数组。
- 构建最小权路径二叉树——哈夫曼树。
- 取数组前两个构建节点,低频为左子树,高频为右子树,频率相同,则深度小的在左。节点的频率为左右子节点的和,将新节点加入数组,按频率从低到高排序。
- 重复 2.1 步骤,完成树的构建。
- 生成编码表。从根节点开始,先序遍历,访问左子树得到 0,访问右子树得到 1。抵达叶子节点的时候会得到对应此条路径的 01 编码序列,这个编码就是叶子结点字符编码后的值。
- 根据编码表,翻译原数据。
- 保存编码表。这里的编码表和第 3 步不同。从根节点开始,先序遍历。非叶子节点,保存 0,叶子节点,保存 1 以及叶子结点字符(8 位二进制表示)。最终会保存一串 00111010001 这样的二进制序列。
解码则是对应的逆向操作。根据保存的编码表构建哈夫曼树,然后译码压缩后的数据。
注意,生成编码表的时候不能去掉前导 0。比如 0010 就是 0010,不是 10,压缩时保存的就是四位二进制。
此外,编码后数据在保存到 buffer 和读取 buffer 的时候要注意,如果字节内部索引是从右往左读取,保存和读取的时候需要反转二进制位。比如读取 10010,如果从右往左读取,尝试两位的时候是 01,而实际上应该是 10,因为生成的 code 是从根节点开始的:1 -> 0 -> 0 -> 1 -> 0。
实现
代码里按位读写二进制数据用到的 BitKit 代码在这里:ArrayBuffer 按位数存取数字。
/**
 * 哈夫曼压缩
 **/
const Huffman = {
  decode(buf) {
    if (Object.prototype.toString.call(buf) !== '[object Uint8Array]') {
      throw new Error(`Huffman.decode 的参数需要是 Uint8Array`)
    }
    // 前两个字节是编码表字节长度
    const tableLength = (buf[0] << 8) + buf[1]
    // 构建哈夫曼树
    const trie = this._buildTrieReverse(buf.slice(2, tableLength + 2))
    // 生成编码表
    const table = this._getTable(trie)
    // 编码表值(code_bitLength)为 key, key 为值,方便解码时快速查询
    const reservedTable = {}
    for (let i = 0, len = table.length; i < len; i++) {
      if (table[i] !== undefined) {
        reservedTable[`${table[i].code}_${table[i].bitLength}`] = i
      }
    }
    // 解码
    // 原数据字节长度--数据前 4 个字节
    let dataLength = 0
    for (let i = 0; i < 4; i++) {
      if (dataLength) {
        dataLength <<= 8
      }
      dataLength += buf[tableLength + 2 + i]
    }
    // 原数据长度的二进制流
    const rawData = new Uint8Array(dataLength)
    // 压缩数据解码
    const compressedBuf = buf.slice(tableLength + 6)
    let decodeLength = 0
    let bitPos = 0
    let currBitLength = 0
    let currNum = undefined
    let detectiveCode = null
    while (decodeLength < dataLength) {
      currBitLength = 0
      currNum = undefined
      // 查找原数据
      while (currNum === undefined) {
        currBitLength++
        detectiveCode = BitKit.read(compressedBuf, bitPos, currBitLength)
        currNum = reservedTable[`${detectiveCode}_${currBitLength}`]
        if (currBitLength > 256) {
          throw new Error('解压错误')
        }
      }
      rawData[decodeLength] = currNum
      bitPos += currBitLength
      decodeLength++
    }
    return rawData
  },
  /**
   * 压缩
   * @param {Uint8Array} buf
   * @return Uint8Array
   **/
  encode(buf) {
    if (Object.prototype.toString.call(buf) !== '[object Uint8Array]') {
      throw new Error(`Huffman.encode 的参数需要是 Uint8Array`)
    }
    // 频率统计。
    // 统计一个字节共 256 种数值分别出现的次数
    let arr = new Array(256).fill(0)
    for (let i = 0, len = buf.length; i < len; i++) {
      arr[buf[i]]++
    }
    arr = arr.map((freq, num) => {
      return {
        num,
        freq
      }
    }).filter(v => v.freq)
    // 构建哈夫曼树
    const trie = this._buildTrie(arr)
    // 生成编码表
    const table = this._getTable(trie)
    // 编码--前面 4 个字节标识原数据字节长度
    let encodeBuf = new Uint8Array(buf.length + 4)
    for (let i = 0; i < 4; i++) {
      encodeBuf[i] = (buf.length >> ((3 - i) * 8)) & 0xff
    }
    let currBit = 32
    for (let i = 0, len = buf.length; i < len; i++) {
      // let bitLength = BitKit.getBitsByNum(table[buf[i]])
      let bitLength = table[buf[i]].bitLength
      if (currBit + bitLength > encodeBuf.length * 8) {
        const newBuf = new Uint8Array(encodeBuf.length + 1000)
        newBuf.set(encodeBuf)
        encodeBuf = newBuf
      }
      currBit = BitKit.write(encodeBuf, table[buf[i]].code, currBit, bitLength)
    }
    // encodeBuf 裁切
    encodeBuf = encodeBuf.slice(0, Math.ceil(currBit / 8))
    // 保存编码表
    const tableBuf = this._saveTable(trie)
    // 合并数据
    const finalData = new Uint8Array(encodeBuf.length + tableBuf.length)
    finalData.set(tableBuf)
    finalData.set(encodeBuf, tableBuf.length)
    return finalData
  },
  /**
   * 构建哈夫曼树
   * @param {array} arr
   * @returns trie
   **/
  _buildTrie(arr) {
    while (arr.length > 1) {
      // 升序排序
      arr.sort((a, b) => a.freq - b.freq)

      const node = {}
      node.left = arr.shift()
      node.right = arr.shift()

      // 权值相等,则深度较小的作为左子树
      if (node.left.freq === node.left.freq) {
        if (node.left.depth !== undefined && node.right.depth !== undefined && node.left.depth > node.right.depth) {
          const temp = node.left
          node.left = node.right
          node.right = temp
        }
      }

      node.freq = node.left.freq + node.right.freq
      node.depth = Math.max((node.left.depth || 0), (node.right.depth || 0)) + 1

      arr.push(node)
    }
    return arr[0]
  },
  /**
   * 生成编码表
   * @param {trie} trie
   * @returns array
   * 返回一个 256 长度的数组,下标为原数字,元素为对应的编码{ code: number, bitLength: number }——bitLength 用来避免 0b01 变成和 0b1。这是为了方便编码的时候直接通过下标查表。
   **/
  _getTable(trie) {
    const arr = new Array(256)

    getChildTrie(trie, 0, arr, 0)

    return arr

    function getChildTrie(trie, code, arr, bitLength) {
      if (!trie.left && !trie.right) {
        arr[trie.num] = {
          code,
          bitLength
        }
        return
      }
      if (trie.left) {
        getChildTrie(trie.left, code << 1, arr, bitLength + 1)
      }
      if (trie.right) {
        getChildTrie(trie.right, (code << 1) + 1, arr, bitLength + 1)
      }
    }
  },
  /**
   * 保存编码表
   * @param {trie} trie
   * @returns Uint8Array
   **/
  _saveTable(trie) {
    // 前两个字节标识编码表字节长度
    let buf = new Uint8Array(514)
    let currBit = 16

    recursive(trie, buf)

    // 编码表长度
    const length = Math.ceil(currBit / 8)
    buf[0] = length >> 8
    buf[1] = length & 0xff

    // 裁切
    return buf.slice(0, length + 2)

    function recursive(trie, buf) {
      // 非字符节点,保存 0
      if (trie.num === undefined) {
        currBit = BitKit.write(buf, 0, currBit, 1)
      } else {
        // 字符节点,保存 1 和字符(固定 8 位)
        currBit = BitKit.write(buf, 1, currBit, 1)
        currBit = BitKit.write(buf, trie.num, currBit, 8)
        return
      }
      // 左子树
      if (trie.left) {
        recursive(trie.left, buf)
      }
      // 右子树
      if (trie.right) {
        recursive(trie.right, buf)
      }
    }
  },
  /**
   * 根据编码表二进制逆向构建哈夫曼树
   * @param {Uint8Array} buf
   * @param {number} startBit 开始位
   * @returns trie
   **/
  _buildTrieReverse(buf, startBit = 0) {
    return build(buf)

    function build(buf) {
      const node = {}
      const flag = BitKit.read(buf, startBit)
      startBit++
      // flag有值,代表是字符节点——叶子节点
      if (flag) {
        node.num = BitKit.read(buf, startBit, 8)
        startBit += 8
        return node
      }
      // 左子树
      node.left = build(buf)
      // 右子树
      node.right = build(buf)
      return node
    }
  }
}
编码安全性和原数据大小限制
我这里是通过 Number 类型保存编码的。在 JavaScript 里,移位操作最多 32 位。因为哈夫曼树的每一层就是一位,所以不能超过 33 层。
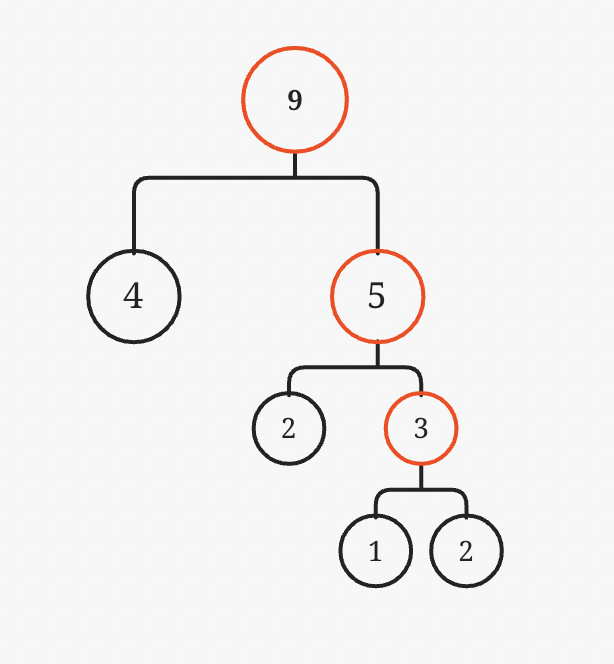
如图所示。每次生成的新节点都不够大,导致平均每一层只有一个叶子结点。这就会导致编码可能超出 32 位的限制,毕竟原字符有 256 种(8位)。所以这里需要计算一下,原文本长度达到多少可能会导致哈夫曼树编码溢出。
设每一次新生成的节点频次为字符数组里剩下元素最小频次,第一层总共频次 1 + 1,第二层 2 + 2……。所以总共 2^32 次方字符数量,即 4,294,967,296 字节,即 4G 数据。
所以一般情况下,我这里的哈夫曼压缩实现还是安全的。实际情况下,也可以分块压缩。毕竟哈夫曼算法需要先遍历数据统计频次,一次性遍历太大的数据也不好。分成小块,比如 1M 一块,进行压缩更现实一些。
总结
哈夫曼算法的压缩率并不是很高,我试了一下,对《舞舞舞》这本小说的 txt 文本进行压缩,压缩率还不到 30%。lzw 也许更好。