Table of Contents
这篇文章记录一下 TinyMCE 在 vue 项目的中的运用。其实早就改写了,但一直……忽略了。这次项目迭代又用到了 TinyMCE,所以补作此文。
为什么选择 TinyMCE
TinyMCE 是一个功能齐全、历史悠久、持续维护的富文本编辑器。该编辑器为美国 Tiny Technologies 开发。wordpress 在切换为古腾堡编辑器之前就是使用的 TinyMCE。因此,项目选择了这个经过长久实践的编辑器。
安装包
首先,需要安装 TinyMCE。
yarn add tinymce
因为是 vue 项目,为了更方便地使用,安装一下 vue 的封装包。
yarn add @tinymce/tinymce-vue
使用
为了项目里各处使用,封装一个 Tinymce 组件
<template>
  <div class="tinymce-container">
    <editor id="tinymce" v-model="value" :init="init" />
  </div>
</template>

<script>
import tinymce from 'tinymce'
import Editor from '@tinymce/tinymce-vue'
import 'tinymce/themes/silver/theme'
import 'tinymce/plugins/image'
import 'tinymce/plugins/link'
import 'tinymce/plugins/code'
import 'tinymce/plugins/table'
import 'tinymce/plugins/lists'
import 'tinymce/plugins/wordcount'
import 'tinymce/icons/default'
import Compressor from 'compressorjs'
import { uploadFile } from '@/api/common'
// 下面的插件是自带的,不需要引入
// import "tinymce/plugins/contextmenu";
// import "tinymce/plugins/colorpicker";
// import "tinymce/plugins/textcolor";
export default {
  name: 'MyTinymce',
  components: {
    Editor
  },
  props: {
    tinymceHtml: {
      type: String,
      default: ''
    },
    tinymceHeight: {
      type: Number,
      default: 500
    }
  },
  data() {
    return {
      value: this.tinymceHtml, // 父组件通过ref拿到该组件的值
      init: {
        selector: '#tinymce',
        // https://www.tiny.cloud/get-tiny/language-packages/
        language_url: '/tinymce/langs/zh_CN.js',
        language: 'zh_CN',
        skin_url: '/tinymce/skins/ui/oxide', // 编辑器需要一个skin才能正常工作,所以要设置一个skin_url指向之前复制出来的skin文件
        height: this.tinymceHeight,
        plugins: 'image link code table lists wordcount', // 引入插件
        toolbar:
          'styleselect fontselect fontsizeselect lineheight link | forecolor backcolor bold italic underline strikethrough | formatselect alignleft aligncenter alignright alignjustify | image quicklink blockquote table numlist bullist | preview fullscreen', // 工具栏
        browser_spellcheck: true, // 拼写检查
        branding: false, // 去水印
        elementpath: false, // 禁用编辑器底部的状态栏
        statusbar: false, // 隐藏编辑器底部的状态栏
        paste_data_images: true, // 允许粘贴图像
        menubar: false, // 隐藏最上方menu
        toolbar_mode: 'wrap',
        file_picker_types: 'image',
        images_upload_credentials: true,
        fontsize_formats: '14px 16px 18px 20px 24px 26px 28px 30px 32px 36px', // 字体大小
        font_formats:
          '微软雅黑=Microsoft YaHei,Helvetica Neue;PingFang SC;sans-serif;苹果苹方=PingFang SC,Microsoft YaHei,sans-serif;宋体=simsun;serifsans-serif;Terminal=terminal;monaco;Times New Roman=times new roman;times', // 字体
        lineheight_formats: '1 1.1 1.2 1.3 1.4 1.5 2', // 行高
        style_formats: [
          {
            title: '段落间距',
            // items: [
            //   {
            //     title: '1', block: 'p', styles: { 'margin-top': '1em', 'margin-bottom': '1em' }
            //   }
            // ]
            items: [0, 1, 2, 3, 4, 5, 10, 15, 20, 25, 30, 35, 40].map(item => {
              return {
                title: `${item}px`,
                block: 'p',
                styles: {
                  'margin-top': `${item}px`,
                  'margin-bottom': `${item}px`
                }
              }
            })
          }
        ],
        style_formats_merge: true, // 自定义样式追加到 styleselect
        style_formats_autohide: true, // 隐藏不可用样式
        /**
         * 下面方法是为tinymce添加自定义插入图片按钮
         */
        // 图片上传三个参数,图片数据,成功时的回调函数,失败时的回调函数
        images_upload_handler: function(blobInfo, success, failure) {
          // 图片压缩
          new Compressor(blobInfo.blob(), {
            quality: 0.75,
            maxWidth: 1920,
            success: (result) => {
              _uploadFile(new File([result], result.name, { type: result.type }))
            },
            error: () => {
              _uploadFile(blobInfo.blob())
            }
          })

          function _uploadFile(blobData) {
            const formdata = new FormData()
            formdata.append('file', blobData)
            formdata.append('type', 'product')

            uploadFile(formdata)
              .then(res => {
                console.log(res)
                success(res.data.url)
              })
              .catch(res => {
                failure('error')
              })
          }
        }
      }
    }
  },
  computed: {},
  watch: {
    tinymceHtml(newV, oldV) {
      this.value = newV
    }
  },
  created() {},
  mounted() {
    tinymce.init({})
  },
  methods: {}
}
</script>
<style lang="scss">
.tox-silver-sink,
.tox-tinymce-aux {
  z-index: 3000000 !important;
}
.tox .tox-dialog-wrap__backdrop--opaque {
  background-color: transparent !important;
}
</style>
(这里的大部分代码也是拷贝的其他人的)
说明一下。
tinymce 需要有主题才能显示,这里把主题拷贝到了项目静态资源目录引用。原因忘了,大概是避免打包遗漏吧。
语言文件到 tinymce 网站下载。
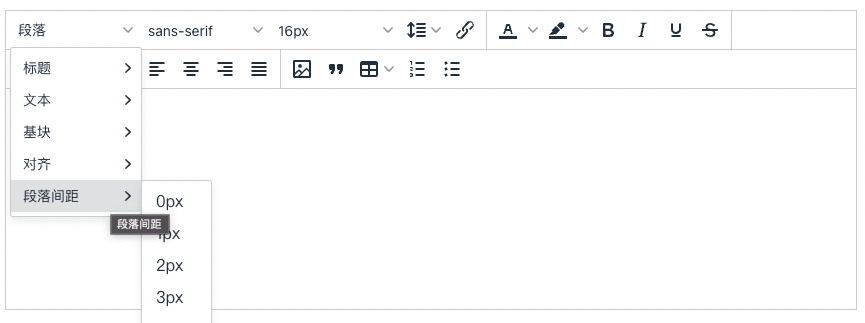
style_formats:可以进行样式自定义。我这里定义了段落间距。tinymce 没有提供相关功能,只能自己定义。可以用,但效果不太好。使用后会把选中的部分标签都变成 p 标签,并应用相关 margin 设置。
style_formats_merge:把自定义的样式追加到样式文件。
images_upload_handler:这里可以进行图片压缩的操作,避免上传图片太大。我使用的图片压缩包是 compressorjs
样式部分的 z-index 是为了避免 element-ui 弹窗 z-index 过高而导致 tinymce 显示问题。
总结
web 的富文本编辑体验并不是很好,与 word 相差甚远。将就用吧。